Risk Profile
The basis for the Risk Profile is a standard visual representation of the relationship between risk and reward for a given Trading Position - a visual representation so standard that you will see it everywhere in any discussion of financial option strategies and with which you are probably already well acquainted (see: http://en.wikipedia.org/wiki/Option_%28finance%29). We have added some unique features to this standard which will help you in the analysis of your Positions.
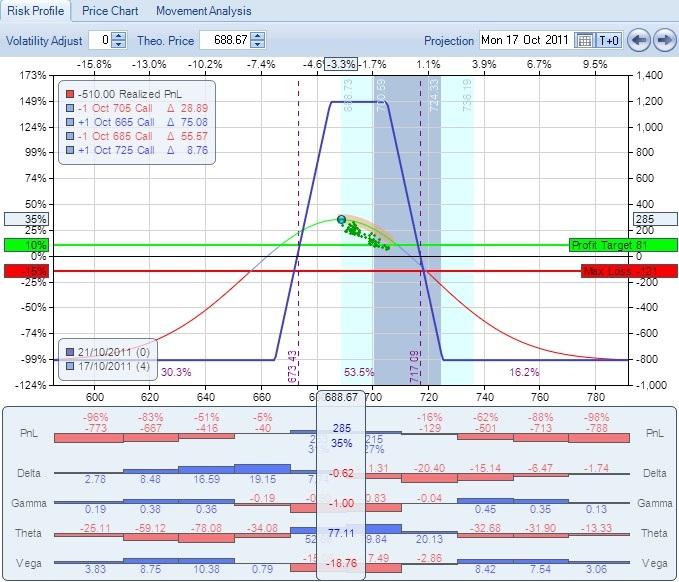
The following screen shot shows an example Risk Profile for a Condor position:
What does this Risk Profile show us?
Firstly, the Position's current overall value - shown as a small green circle - clearly shows that the Position is well in profit at $285 or 35% of the selected Margin. You can also see this is considerably more than the Profit Target (shown by the green horizontal line) and Max Loss (shown by the red horizontal line), set in the Position Snapshot.
Secondly, the daily movement of the Position's overall value as the Underlying vehicles price fluctuates over the current trading day - shown by the scattering of green dots (which are based on actual intra-day prices throughout the trading session) - shows that there is a considerable amount of movement on a daily basis.
Thirdly, we can see that the Underlying has in fact moved almost two Standard Deviations from the close of the previous trading session - this is easily identifiable by the coloured blue zones that depict movements of one (dark blue) and two (light blue) Standard Deviations respectively.
There's lots more information shown on the Risk Profile, so read on to learn more.
The example Risk Profile given above shows quite a complicated graph with much detail. Because this level of information can sometimes be distracting (and unnecessary) ONE gives you the ability to customize the Risk Profile through the use of parameters. These parameters are accessed by right-clicking your mouse anywhere on the Risk Profile (see below) - the resulting popup menu then shows all the available parameters; each parameter can be selected (or de-selected if already selected) by left clicking on the menu item.
The following parameters are available:
The configurable parameters of the Risk Profile |
|
Parameter Name |
Description |
Show Open Trades |
ONE displays a text box at the top left hand side of the Risk Profile detailing each Open Trade, colored blue for options bought and red for options sold. The information given, from left to right, is: 1.Colored box (blue for Open Position, green for Model). 2.The number of contracts bought (positive) or sold (negative) 3.The name of the Option (Expiry month, Strike Price and Strike Type) - for example: "Oct 670 Call". 4.The Greek Delta of the Option (the triangle symbol is the Greek letter "D" or Delta). For example:
|
Show Current Price Greeks |
Whatever Greeks have been selected for display (see below), this parameter adds the current value of those Greeks to a display box immediately below the current price. For example:
|
Show Expiration B/E |
Show Break Even points for the Position - vertical lines indicating where, at expiration, the position crosses over from profit to loss, or vice versa. Between each Break Even point, the percentage probability of being there at expiration is displayed at the bottom of the Risk Profile. |
Show Trade Comments |
Show any comments associated with the Position and current Trading Date in a text box at the top right hand corner of the Risk Profile, along with the local time the trade was made. |
Show Profit Target & Max Loss |
Show two horizontal lines indicating the Profit Target and Max Loss entered as part of the Position creation process. These lines allow the user to gauge the progress of the Position with respect to your pre-defined plan of Profit Target and Max Loss limits set in the Position Snapshot. |
Show Expiration Line |
Show the Expiration Line - the calculated value of the Position at Expiration date (or the nearest expiration date if more than one expiration date is present in the Position) for a range of Underlying prices. |
Overlay all Intra-Day Prices |
Show as a scatter chart every (available) Intra-Day prices for the selected Trading Date. Prices in green indicate a profit position while prices in red indicate a loss position. Note that Intra-Day prices are not available when the Trading Date is LIVE. |
Show Vertical Cross-Hair |
Show a vertical line at the position of the mouse - the corresponding price and Greeks (selected in "Show Current Price Greeks" above) are displayed at the bottom of the chart. |
Greek Configuration - Show Delta |
Show the Position Delta histogram below the Risk Profile. Delta is one of the Greeks - a measure of the sensitivity of the price of the position to changes in the price of the Underlying. |
Greek Configuration - Show Gamma |
Show the Position Gamma histogram below the Risk Profile. Gamma is one of the Greeks - a measure of the rate of change in the positions Delta value. |
Greek Configuration - Show Theta |
Show the Position Theta histogram below the Risk Profile. Theta is one of the Greeks - a measure of how much the position will lose or gain for each passing day (as it approaches its expiration date). |
Greek Configuration - Show Vega |
Show the Position Vega histogram below the Risk Profile. Vega is one of the Greeks - a measure of the sensitivity of the position to changes in volatility. |
For example, the following screen shot shows a Risk Profile with all parameters turned off and the parameter popup menu displayed by right mouse clicking within the Risk Profile itself:
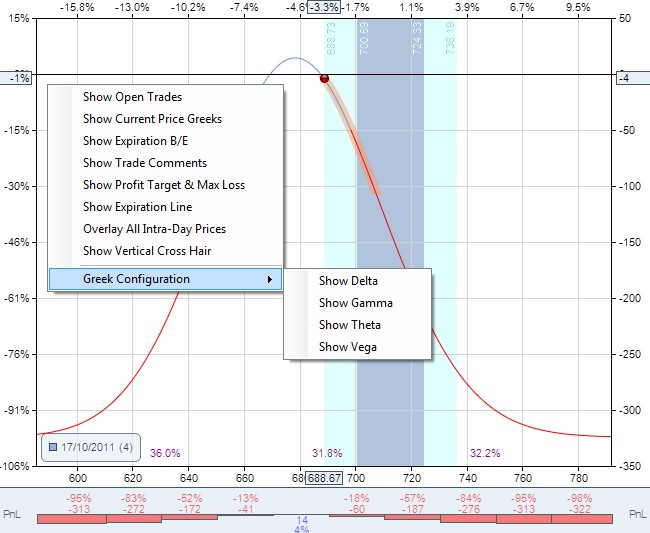
The curved line in the chart represents the value of the Position for the current trading day over a range of Underlying prices - effectively showing what the Position would be worth (either as an absolute monetary amount or as a percentage Profit or Loss) as the Underlying price changes along the x-axis. The line colour provides further information:
•If part of the line is GREEN it represents the Position is at or above the Profit Target (as defined in the Position Snapshot).
•If part of the line is RED it represents the Position is at or below the Max Loss (as defined in the Position Snapshot).
Note the percentage figures running across the top of the chart - these are the percentage movements in the Underlying from the previous trading sessions closing price. The corresponding absolute Underlying prices are displayed running across the bottom of the chart.
Also note the percentage figures running up the left hand side of the chart - these are the Profit and Loss percentages expressed according to the Margin Model selected in the General Settings section of the Configuration tab in the ONE Ribbon (see here). The corresponding absolute dollar Profit and Loss values are displayed running up the right hand side of the chart.
In addition, note the key with the number of days to expiration at the bottom left of the chart.
Finally, the daily Underlying price range is shown as an orange highlighted line on the price line.
The above Risk Profile is probably too bare and devoid of detail to be of use to most option traders. However, it shows how the chart can be customised to suite your individual preferences.
Now adding the Expiration Line shows the following Risk Profile which provides some additional information:
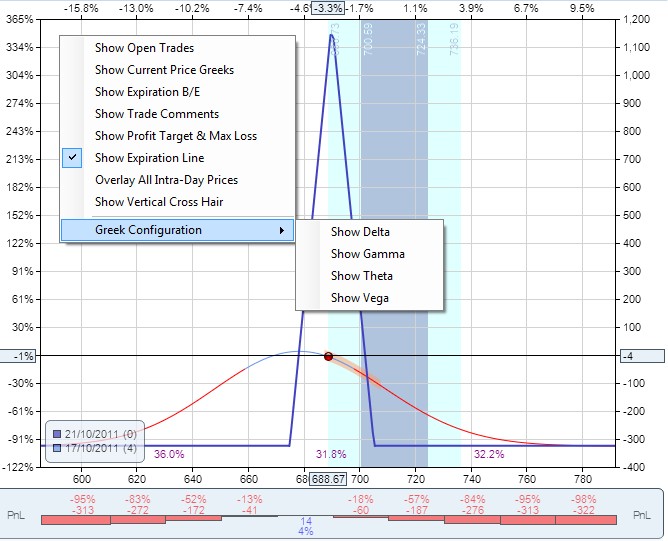
Note that the expiration line is dark blue - clearly demarcated from the current trading days pricing line, which we generally refer to as T+0 (Today +0 days). You can also see the key at the bottom left of the Risk Profile now shows both lines (light and dark blue) with their respective Expiration Dates and number of Days To Expiration in brackets.
To really understand what the various parameters do, we recommend that you try them out, noting the different look and feel, and level of information displayed in the Risk Profile. Try to achieve a chart that you feel comfortable with - a chart that shows enough detail for your purpose, while remaining clear and uncluttered.
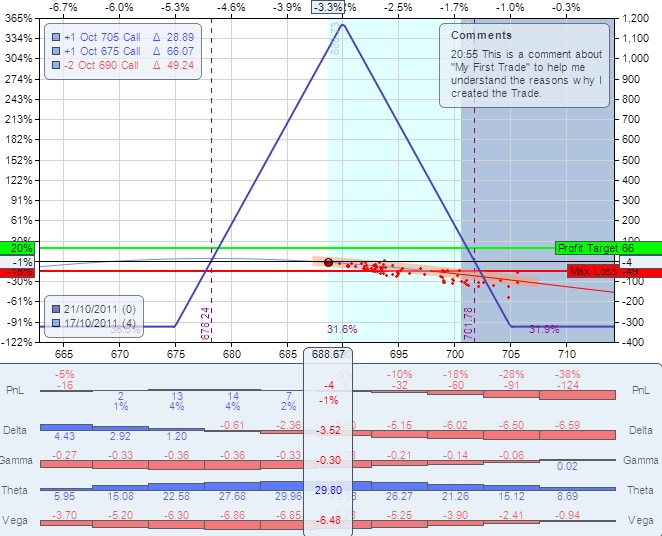
For example, lets look at the extreme case where switching on all parameters gives a Risk Profile as follows:
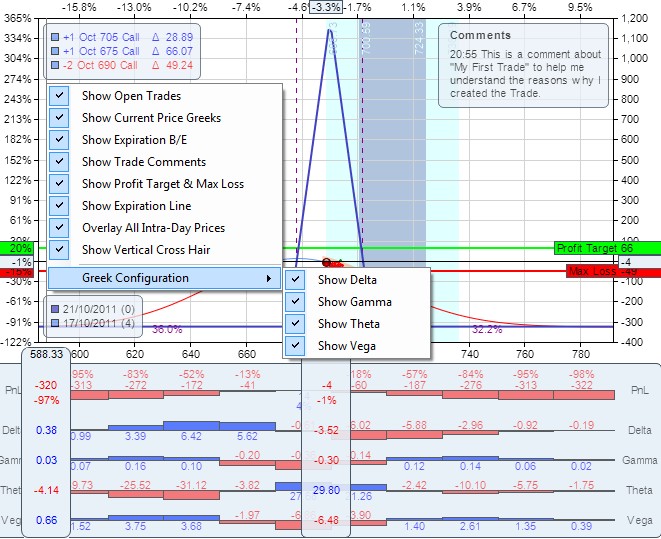
In the above screen shot, the parameter selection menu is shown for illustrative purposes only (it pops up when clicking on the right mouse button anywhere on the chart), but this Risk Profile clearly shows:
•Open Trades in a box at the top left hand corner.
•Current Price Greeks immediately under the current Underlying price, highlighted in a box.
•Expiration Break Evens - the two vertical lines which mark the transition from loss to profit and vice versa.
•Trade Comments in a box at the top right hand corner.
•Profit Target and Max Loss as green and red horizontal lines respectively.
•Expiration line as a dark blue line.
•Overlay of Intra-Day prices as red or green scatter dots (representing loss or profit of the position in 5 minute intervals over the entire trading session).
•Vertical cross-hair - in the above example this is currently positioned at the extreme left hand side of the chart; note the corresponding Greeks displayed below the Risk Profile in line with the cross-hair.
•The key in a box showing the expiration date and number of days to expiry at the bottom left hand side.
•The Greeks histogram running along the x-axis below the Risk Profile.
The Risk Profile has an important role in the analysis of a Position and to facilitate this ONE allows certain defining elements of the Position to be manually adjusted to perform "what if" scenarios - that is, to see how such changes would effect the Position's Risk Profile and corresponding Greeks.
The elements that can be changed are found above the Risk Profile area, as shown in the following screen shot:
![]()
The What if scenario Elements of the Risk Profile |
|
Element Name |
Description |
Volatility Adjust |
Adjust the volatility of each leg of the Options Position by this amount (positive or negative) to determine the effects of an increase or decrease in market volatility. |
Underlying Price for Theoretical Values |
Adjust the price of the underlying used in the Pricing Model to calculate individual option prices. This will allow the simulation of price risk and show the resulting Position and individual option Greeks. All values in the Option Chain, Trade Analysis and Risk Profile will be recalculated using this theoretical underlying price. The risk graph will show a green or red diamond for prices within the actual underlying daily price range (profit or loss respectively) that can be traded, and a black cross for prices outside of the daily range that cannot be traded. Please note that this feature is only enabled when using historical data and is disabled while ONE is using its LIVE data feed. |
Projection Date |
The date used in the Pricing Model to calculate individual option prices. Click on the calendar symbol, use the left and right arrow buttons or select the required day increment from the T+0 button. This will allow the simulation of time decay and show the resulting projected Position and individual option Greeks for any number of trading days in the future, until Expiration. All values in the Option Chain, Trade Analysis and Risk Profile will be recalculated using this projection date. The T+0 line on the Risk Profile will also be updated to reflect the projected Profit and Loss. In addition, the one and two Standard Deviation zones (representing the probability of movement given the current volatility level) will be updated accordingly. A T+0 projection date will always centre the Standard Deviation zones around the Underlying closing price of the previous trading session, whereas anything greater (T+1, T+2,...) will be centred around the current Underlying price. |
To zoom in or out of the Risk Profile use the following control at the bottom right of the main window, below the Risk Profile:
![]()
Click the + or - buttons to zoom in or out respectively. Alternatively, drag the bar in between the + and - buttons left or right or click anywhere between the buttons to initiate the zoom.
For example, to help view the above Risk Profile more clearly, zooming in displays the following result:
Check that you have ticked the "Plot" checkbox on the Trade Analysis screen (see here).